Combine screen mirroring with annotation and drawing features in Microsoft Word, PowerPoint, OneNote and Excel to easily share and illustrate your ideas on larger displays. Use this guide to learn how any computer equipped with the Ditto screen mirroring app and Microsoft Office will boost team collaboration and make meetings more clear, productive and efficient. Plus, see how you can use shared files in Office to allow multiple users to annotate and draw on files at the same time.
Here’s what you need:
How to use Ditto to screen mirror your annotations
You’ll need Ditto to wirelessly share your computer screen to larger displays while using the Office apps. Without a way to screen share, you’ll be missing the in-person group collaboration component of this guide. A brief setup is required before you can begin. This should take about 10 minutes. First, you need to create a Ditto account (30-day free trial available).
Then, set up Ditto on the displays you want to mirror to. Learn how to set up Ditto here. This won’t take long.
Now you’re ready to begin using Ditto to screen mirror your Microsoft Office files, drawings and annotations to larger displays during meetings, presentations, classes and more.
How to add drawings, annotations and more in Microsoft Office apps
There are two methods in this guide: Method 1 shows you how to annotate and draw on your slideshow while presenting a PowerPoint. Method 2 shows you how to annotate and draw inside any open files in a Microsoft Office app. If you’re not in the middle of a slideshow presentation, use Method 2.
Method 1: Annotate and draw while presenting a PowerPoint
Step 1
Open PowerPoint and begin presenting your slideshow.
Step 2
Hover over the helper buttons in the lower left corner and select the pen icon.

Step 3
Click Pen.

Step 4
Now you can use your mouse to draw, write, circle and underline important parts of your presentation. Select “Highlighter” or “Laser Pointer” for more functionality, like keeping your audience focused on the most important content while you’re presenting.

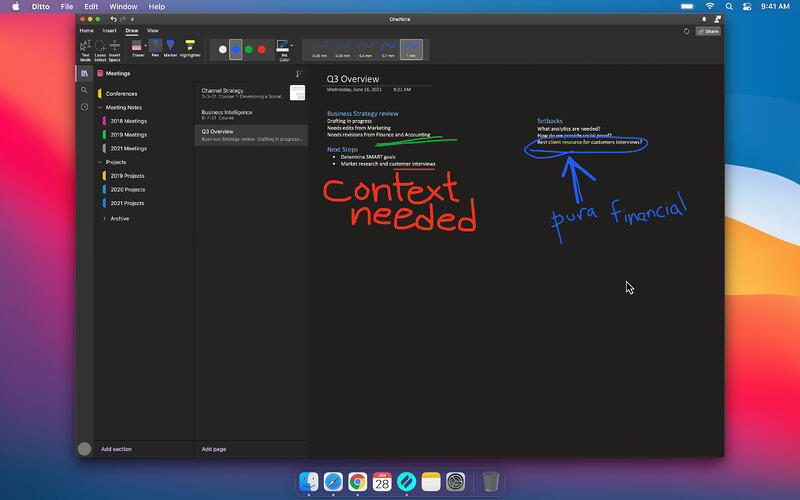
Method 2: Annotate and draw in any Office app — Microsoft Word, PowerPoint, OneNote or Excel
Note: If you’ve shared a file with someone, such as a shared notebook in OneNote, any users with sharing permissions can annotate and draw on the same file at the same time. This makes collaboration really easy between multiple people.
Step 1
Open your preferred Microsoft Office app: Word, PowerPoint, Excel or OneNote. We’ll use OneNote in this example.
Step 2
Open the note or file you want to draw in or annotate.
Step 3
In the top menu, click Draw.

Step 4
Choose your preferred annotation tool: Pen, Marker or Highlighter.
Now you can use your mouse to draw, write, highlight and underline important parts of your note.

Pro Tips:
Use a digital laser pointer in PowerPoint to keep your audience focused on the right content:
Step 1
While presenting your PowerPoint, hover over the helper buttons in the lower left corner and select the pen icon.
Step 2
Choose Laser Pointer.
Step 3
Now your mouse pointer will become a glowing red dot that allows audiences to focus on what’s most important — just like a physical laser pointer.
Convert handwritten ink to actual text:
Step 1
Draw some text with a marker or pen tool.
Step 2
In the Draw menu, select Lasso Select.
Step 3
Circle the handwritten ink with the Lasso Select tool.
Step 4
Click Ink to Text in the menu. Your handwritten ink will convert to editable text in a text box.
Using these built-in tools from your favorite Microsoft Office apps will improve your productivity and encourage more clarity and creativity in your work. When you wirelessly mirror your computer screen to a larger display like a TV or digital board with Ditto, everyone in the room will see what’s being annotated and what they should focus on most. It’s just one way Ditto helps you improve collaboration for everyone you work with.
